 WebMail
  LiveChat
  Support

How to Change the Author of a Post in WordPress
Do you want to change the author of a post in WordPress?
Sometimes you may need to change a post to a different author than the user who first uploaded it. You can do this without having to copy and paste the post using a different account.
In this article, we’ll show you how to simply change the author of a post in WordPress with just a few clicks.
Before You Change the Author of a WordPress Post
If you just want to show your own name on a post written by another user on your WordPress site, then you’re ready to follow the instructions in this article.
But, if you want to show a different user as the author, then you need to make sure this user exists on your WordPress site first. See our guide on how to add new users and authors in WordPress for detailed instructions.
You can view and manage all the users on your WordPress site by visiting the Users menu item when logged in with your WordPress administrator account.

If you only want to change the way your name is displayed, then check out our guide on how to add or change your full name in WordPress.
Having said that, let’s look at how to quickly and easily change the author of a post in WordPress. There are a few ways to do this, so use the links below to jump to the method you want to use.
- How to Change the Author From the Block Editor
- How to Change the Author from the Classic Editor
- How to Change the Author from Quick Edit
- How to Change the Author of Multiple WordPress Posts
How to Change the Author From the Block Editor
If you use the Gutenberg block editor, then you first need to open the post or page where you want to change the author name. On the post edit screen, you need to make sure Post is selected in the right-hand sidebar.
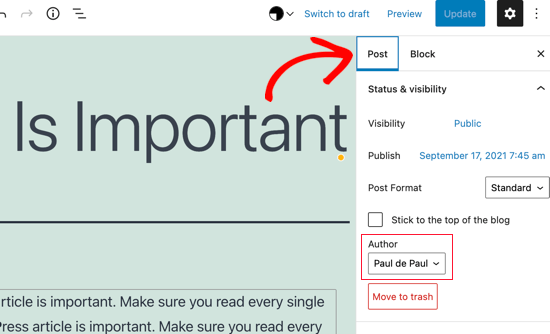
Then, locate Author under the ‘Status & Visibility’ section and you’ll see a list of available authors to choose from. You need to select the new author name from the drop down menu.

Once you’ve done that, make sure you click ‘Update’ or ‘Save Draft’ to save your changes.
That’s it, you have successfully changed the author of a post in the Gutenberg block editor.
How to Change the Author from the Classic Editor
If you’re using the classic WordPress editor, then simply open the post or page where you want to change the author name. You will likely not see the author panel in the editor, especially if you recently started your WordPress blog.
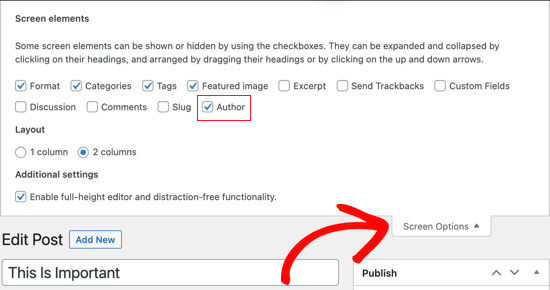
You will need to click on the Screen Options button at the top right corner of the screen. This will show you a menu with several options that you can show or hide on your post edit screen.
Go ahead and click on the checkbox next to the Author option.
The author panel should now be visible on the screen. You need to click on the current author’s name and then you will see a list of available authors to choose from.
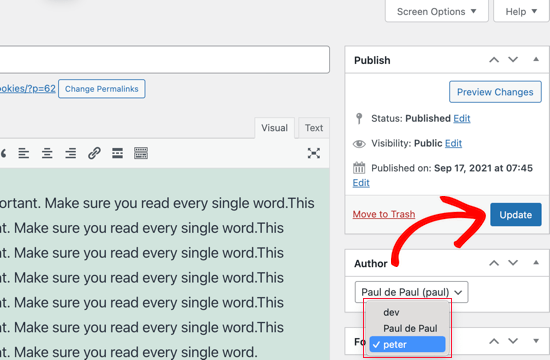
Once you have chosen a new author, make sure you click ‘Update’ or ‘Save Draft’ to save your changes.
Congratulations, you have successfully changed the author of a post in the classic editor.
How to Change the Author from Quick Edit
You can also quickly change the author of a post from the Quick Edit screen while viewing all posts from the Posts » All Posts page.
First, should hover your mouse over the post you wish to change and a menu should appear. Now you need to click the Quick Edit link.
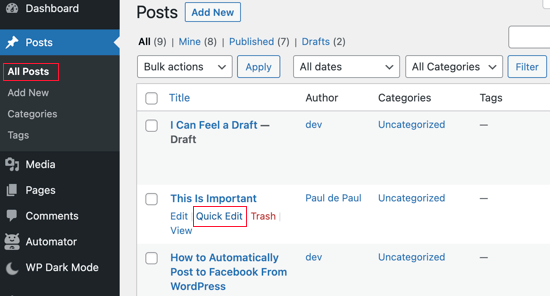
The Quick Edit metabox will now be displayed. You’ll need to click on the current author’s name and select a new author from the list. After that, you should click the Update button to save your changes.

Well done, you have changed the post’s author using Quick Edit.
How to Change the Author of Multiple WordPress Posts
Changing the author for multiple posts using the methods above would take a lot of time. Luckily, there’s an easier way to quickly change the author for multiple WordPress posts at once.
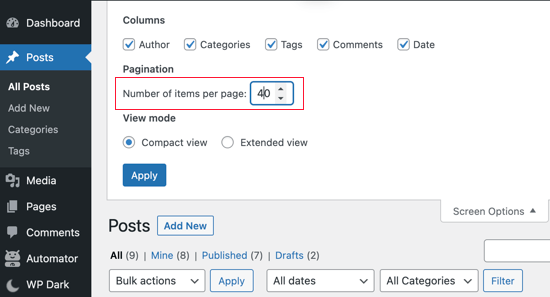
To bulk update authors, you should first navigate to the Posts » All Posts page. This will list all the posts on your WordPress site.
By default, WordPress shows 20 posts per page. If you want to display more posts, then you need to click on Screen Options and change the number of posts you want to display.
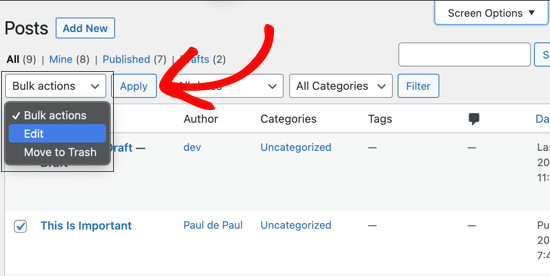
Now you need to select the posts where you want to change the author.
After selecting the posts, you should select Edit from the ‘Bulk Actions’ dropdown menu and then click the Apply button.
WordPress will now show you ‘Bulk Edit’ metabox. You need to select the new author by clicking on the dropdown menu next to the Author option.
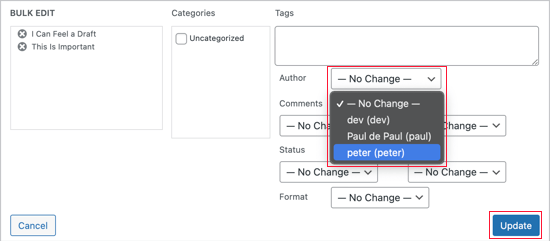
Don’t forget to click on the Update button to save your changes.
That’s it, you have successfully changed the author for multiple WordPress posts without editing them individually.
How to Optimize Your Author Profiles for SEO
Finally, you may want to optimize your author profile pages to improve your SEO rankings. The author profile is what appears at the bottom of blog posts published under your name.
Here you can add a brief bio, links, and even your social media profiles.
By showcasing your author bio, you can build more credibility and give your readers a chance to learn more about you and the authors on your site.
WordPress allows you to add a brief author bio, but to add social media links you’ll need to use a WordPress author bio plugin.
Aside from that, you’ll also want to improve your Author archive pages where WordPress displays a list of posts written by that author.
To optimize author pages for SEO, we recommend using All in One SEO. It’s the best SEO plugin for WordPress used by over 2 million websites. For more details, see our guide on how to install a WordPress plugin.
Upon activation, simply navigate to Users » Profile to edit your author profile. Next, scroll down to the ‘All in One SEO Pro’ section where you can add links to your Facebook and Twitter profiles and create an author bio.
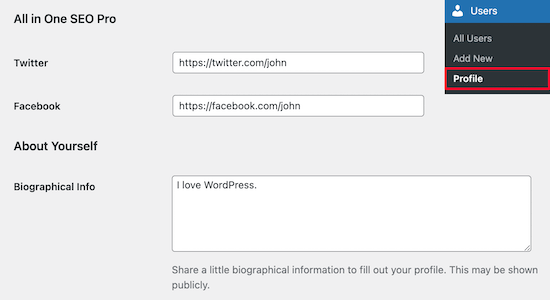
Once you’ve made the necessary changes, make sure you click ‘Update Profile’ at the bottom of the page.


